How does Wonder Woman keep her tiara on in battle? Most of the replicas on the internet seem to
be rigid half crowns or fabric designs. An Amazon warrior princess needs some flexibility, so my design incorporates a combination of leather and elastic.

I used the same two types of leather for this project as I
did for the armband. The black leather
shown below is a thick and very smooth piece, good for maintaining its shape,
while the tan leather in the second photo is thinner and more flexible. An integral part of this project is an
elastic headband, which is pictured below in a package of two. This type of headband is thin, soft, stretchy, and has a sticky
"grip" side so it doesn't slip in your hair. (Thanks for the suggestion, bbqueensarah.)

Additional materials used include: acrylic paint (thalo gold and black to match the armband and bracelets), scissors, pencil, pen,
permanent marker, and two paintbrushes (fine tip for details and medium tip for
wider areas.) Not pictured: paper

Leatherworking tools include: Awl, thread, sew on Velcro,
Ecoweld (leather cement), needles, and ruler.

I also used Leather Sheen (acrylic clear coat), a large
flat brush for applying it, and an art knife.

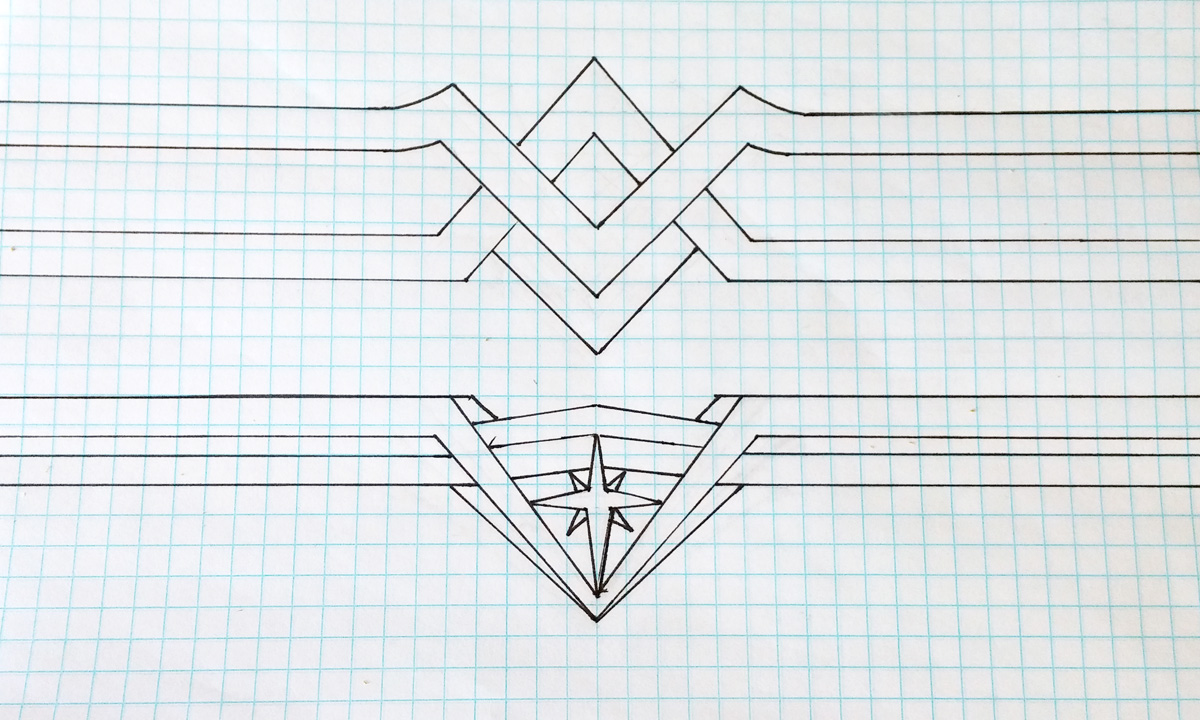
I sketched out my design in the actual size I wanted on
graph paper and traced over it in pen once I was satisfied with the shape. I made a quick photocopy on my printer so I
could cut the pieces out without destroying my original (optional.) As I traced the pattern, I added about an
extra inch of length to each end of the tiara. [The image below shows both the armband design and tiara design together.]
Next, I cut out the leather pieces using my pattern. The base piece of the tiara and
the star were done with the thinner leather and all the other pieces were done with
the thicker leather. I used the knife to
help cut the delicate star pieces.

In addition, I cut out two small leather rectangles
which will be sewn at the ends of the piece. They will wrap around the headband to help secure
it to the tiara.

The headbands I purchased at the store were too wide to fit
behind the tiara, so I cut one in half lengthwise. Next, I sewed a piece of the coarser Velcro to
the non-sticky side of the headband. I stood in front of the mirror and put on the
headband, grip side touching my hair and skin, and positioned it comfortably so so the
Velcro piece was centered. Then I placed the unfinished tiara over top, centering it as well, and marked
the back of the leather where the it overlapped with the Velcro. I used the awl to punch holes in the leather
and then used the needle and thread to sew a piece of the soft Velcro to the back of the
tiara.

Next, I glued the bottom stripe to the front of the base
using Ecoweld. Once dry, I punched two
small holes in the black leather on each side where the top stripe would overlap (so the
stitching will not be visible in the final piece.) I used a needle and thread to secure the
pieces together in the areas shown by the red Xs.

Afterward, I glued the top stripe and middle section. Once dry, I used the awl to punch six more
holes, shown by the green Xs below. I
kept the holes as small, neat, and symmetrical as possible to minimize their
appearance on the final piece. Again, I
used needle and thread to stitch the leather
together. I also sewed the ends of the top and bottom
stripes to the ends of the tiara.

I then glued the small leather rectangles to the ends of the
tiara, as shown below. After the Ecoweld
dried, I punched holes and also sewed the rectangles to the ends of the
tiara. On the back of the rectangles, I sewed a thin strip of soft
Velcro at the top and a thin strip of the rough Velcro to the
bottom (see second photo down.) As shown below on the right hand
side of the tiara, the rectangle folds up in the back and fastens. I also glued the star to the front of the
tiara (not pictured.)

I tried on the headband and tiara and made tiny marks where
the tiara and headband overlapped. I
glued six very small pieces of the rough Velcro to the back of the tiara, three
on each side. These six pieces are not
meant to actually fasten to another piece of Velcro. They come into contact with the soft headband and keep it aligned with the tiara. The pieces need to be
very small so the rough material doesn't touch your skin.

Next, I painted the tiara using different shades of black
and gold. I used thicker coats of paint
over the three small stitches to help disguise them, as well as a sharp
contrast in tones at the bottom V. I did
not make any effort to hide the stitching at the ends of the tiara, as those
will be hidden under my hair. Once the
paint was dry, I finished with an acrylic clear coat.

The final design is meant to attach in two pieces. First, put on the headband, as shown below,
with the "sticky" side down and the Velcro piece in the middle of your forehead.

Next, fix the tiara over top. The piece of Velcro on the middle of the
tiara should align with the Velcro strip on the headband. The ends of the tiara fold up in the back to attach to
the headband.

Finally, the tiny strips
of Velcro on the back of the tiara should align gently with the headband to
help keep it from slipping.

The final result is flexible and comfortable.

Edit/Update (06/01/17):
I have gone back and applied additional surface protection to the tiara. The Leather Sheen I used initially made an immediate difference on protecting the paint, but when designing the boots I realized footwear would need more protection. I e-mailed customer service as the Angelus company and they recommended the two products below- one is a finisher specifically to protect the paint (applies with a brush) and the other is a repellent that causes water to slide right off the leather (spray application.) I decided to go back and apply them to the rest of my costume as well, including the tiara. Although I chose matte finish, the products did add a slight amount of shine to the leather. I still intend to entirely avoid getting the costume wet.

I'm just starting to research cosplay and this is by far the best WW headband tutorial I've come across. The head band is genius! Thank you!
ReplyDeleteThanks! Good luck!
Delete