Wonder Woman boots are finally done!
Most of the modern Wonder Woman footwear on the internet appears to be
two separate pieces- gold wedge heels and the dark red greaves. However, since this wonder woman is less than
graceful in heels and has no shoe making experience, my Wonder Woman costume
consists of two true boots.
I got the idea several months ago and managed to snag some
tall boots on clearance at Belk; these will form the base of the footwear.
I started with three main types of leather for this project:
a thin, smooth, supple leather (tan); slightly thicker leather (black), which
was from the same remnant material as the Wonder Woman skirt; and a thicker
brown leather for the straps.
Optional, depending on the type of boots used: Toward the
end of construction, I realized I would need to reinforce the front interior of
these boots structurally and I used a very thick piece of leather to do so. (This
is the same material as that used in my tiara and armband projects; I just used
what was left over and it was less than half of one of the leather pieces below.)
Sewing supplies: Sewing machine with leather needles,
needle, thread, scissors, awl, needle nose pliers, measuring tape.
Paint and finishing supplies: Acrylic paint (note the silver and gold are
the same used in all the previous Wonder Woman costume pieces for continuity),
leather cement, acrylic finisher, repellant, and paintbrushes. I do NOT recommend the red paint pictured
here! I don't like the adhesion/body
when dry and would recommend that you find another type.
Other supplies: Newspaper,
foam, pins, pocketknife, double cap rivets (two sizes, more details in Part II),
rivet tools, hammer, Velcro, ruler, clips, permanent marker, white charcoal
pencil, leather punch, and 22 clasp rivets. Not
pictured: masking tape
If your boots have a zipper: Scotch tape to protect end of
track while working, either epoxy or paracord and candle to finish the
ends. (Not pictured)
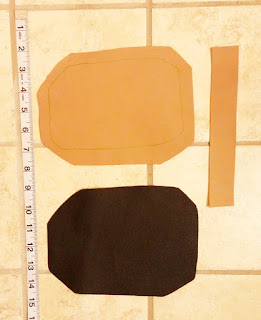
My first step was to create a rough pattern out of newspaper
to create the shape of the greaves. Your
exact size and shape will depend on your own measurements, but my basic
patterns and sizes are shown below to give you an idea of what you will end up
with. The front and back of the greaves should be sized so there is about an inch of space between the
front and back pieces.
There are three distinct sections of the greaves: the
kneepad, the middle, and the bottom of the greaves.
The kneepad is comprised of three separate pieces which will
later be fastened together. In order to get
the thickness I wanted, I cut two identically shaped
pieces of leather for each section- a smooth front piece (tan with a matching strip to sew down the
middle) and a thicker back (black) piece.
The front middle is one long piece with a matching strip to
sew down the front. It will then be sewn
directly onto the boot.
The back middle is also one piece with a matching strip and
will be sewn onto the boot as well.
The bottom of the greaves is also three sections. Each section has a front (tan) piece with
matching strip and a back (black.)
Once the leather pieces were cut out, I clipped the front and
the back of the middle of the greaves to the boots to check the size and make adjustments as
needed before sewing.
After I was satisfied with the size and shape of the leather
pieces, it was time to begin cutting. I
traced the front center piece of the greaves onto the boots with the charcoal
pencil, being sure to center it carefully first. Then, I cut along the lines. I recommend that you leave a little extra
room- it is easy to cut more material off later but you can't add it back
on. I then traced the back middle of the greaves on and cut along the lines. Remember, you will want to cut out a
one inch section to form the gap on each side between the front and back of the
greaves.
The next step is to begin gluing and assembling the leather
pieces. Each section of the softer (tan)
leather has a matching strip that should be cemented on top. Disclaimer: Throughout this whole process, I do not recommend you allow the
cement to overlap with the areas you will later be stitching in order to
protect your sewing machine.
Once the cement had dried, I drew straight lines with a
ruler along the vertical edges of the strips and stitched the pieces of tan leather together with
my sewing machine. The leather I chose
was thin enough to use with my particular sewing machine, but I did go through
multiple leather needles in the process.
You will have to determine for yourself whether you should run your
leather through your machine or whether you will have to hand stitch.
After all my strips had been sewn to the leather, I put each
section together as described below.
Kneepad of greaves:
For the top and bottom of the kneepad, I simply cemented the
front (tan) piece of leather to the back (black piece.)
For the middle of the kneepad, I needed something more three
dimensional. I used a technique of
molding wet leather I'd read about on the internet. There may be better techniques out there, but this worked fine for my purposes.
Since I had neither the supplies nor time to carve a wooden
mold, I carved a rough knee shaped mold out of the protective styrafoam my
sewing machine was packed in, using a pocketknife.
I soaked the black leather in warm water until bubbles stopped forming and molded it over the foam. I stuck straight pins in the foam itself (not the leather) to help keep the general shape while it dried.
After it dried, I cemented the top (tan) piece onto the
black piece and molded it with my hands.
Then I let it dry as well. Once
dried, I cut the edges off to form the final shape. This technique gave the leather some
dimensionality but did not leave it rigid, which I was afraid some of the other
leather forming methods might do.
The middle of the greaves:
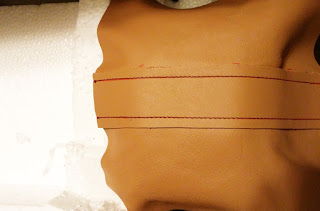
I started with the middle front piece and drew the three line pattern on the
front in marker. I also drew a line
around the entire outside edge. Next, I
cemented the leather to the front of the boots.
Once it was dry, I sewed the leather to the boots along the marker
lines- both the lines in the middle and the lines around the edge.
This will securely fasten the pieces together and give a
slight appearance of three dimensionality along the three lines. I was NOT able to use the sewing machine for
the entire outside of the leather pieces.
I did what I could with the machine and stitched the rest by hand. Again, depending on your leather, boot
material, and machine, you may have to hand stitch more or all of it.
I then followed the exact same steps for the back piece of
the greaves, making sure to leave a sufficient gap between the front and back
pieces and trimming before attaching if necessary. Remember the pockets I made for the Wonder
Woman skirt? I could only fit one of
them on the skirt, so I decided to use the other in the boots. I sewed the pocket along the top edge of the
back right leg greave for an easy place to stash some cash. It fit perfectly!
My particular pair of boots came with a zipper- it was
significant to the structure and securing of the boots to my feet so I left it
in place but shortened it significantly when I cut the boots to attach the
middle of the greaves. If yours has a
zipper, I strongly recommend fastening scotch tape on the top edges to prevent
the zipper from coming off the track while you are working on it!!!
Once I had the zipper to the exact length I wanted, I
finished the top ends to prevent the zipper from going off track. I melted plastic (paracord) to finish the
ends and trimmed with the pocketknife, but you could also use some sort of
epoxy to do the trick. I also stitched
the edges of the boot near the zipper as needed.
Three bottom pieces of greaves:
First, I sewed Velcro to the back of each of the back
(black) pieces. I used a whole strip
down the middle and a half strip on the sides.
This will be used later for affixing this part of the greaves to the
boots.
Next, I cemented the front (tan) and back (black) pieces
together and let them dry.
I attached the opposite type of Velcro to the boots
themselves using needle and thread. Some
parts of the boots were so tough that
they required the use of the awl and needlenose pliers in order to stitch on
the Velcro. You will want to use the
actual greaves pieces to help you align the Velcro strips properly on the boots.
This is the end of Part I and the majority of the actual
boot construction. Part II will focus on
painting, finishing, and final assembly.


No comments:
Post a Comment