Last winter, I started creating a suede jacket using a soft
garment grade sheepskin I’d gotten from Tandy Leather Factory. It was a lot more difficult than I
anticipated, but I’ve finally completed it in time for fall!

Materials needed:
Scissors, lining material, garment
grade sheepskin (multiple skins), coat hooks (6), buttons (8), needles, and awl

Thread (3-4 spools), sewing
machine with leather needles, clips, tape measure, marker, ruler, newspaper
(optional, not pictured), slide adjuster, pins

I created my own rough pattern with newspaper and used a well
fitting jacket I already owned to help me estimate the size of the pieces I designed.
I traced the pieces onto the back of the sheepskin and cut them out. I then traced the non-decorative pieces of
the jacket onto a lightweight material that I would later assemble for the jacket’s
lining.

Here are the main shapes and pieces I created:
Back of jacket:

Front of Jacket:

Miscellaneous:
A- Three belt pieces
B- Inside flap
C- Decorative strips for front
D- Shoulder pieces
E- Collar
F- Belt loops

Arms:

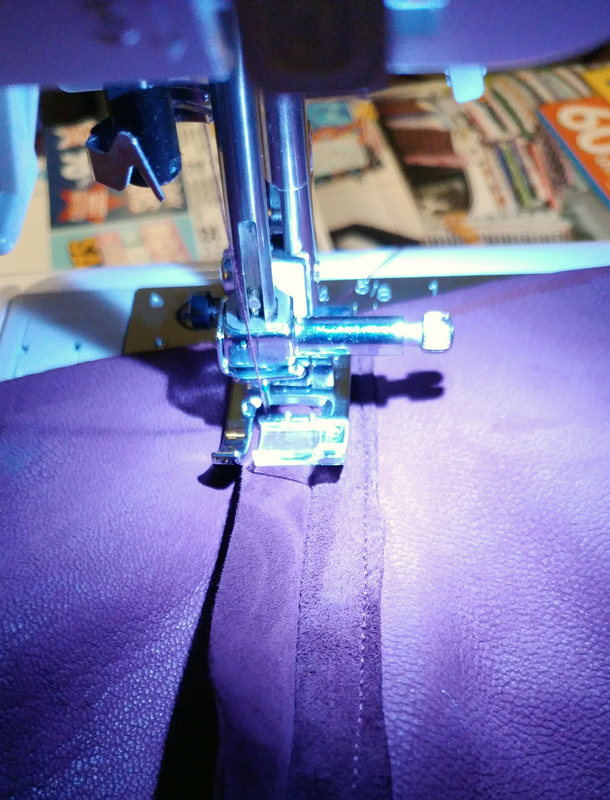
I began stitching together the pieces of suede, starting
with the back center of the jacket. At
each seam, I also folded the edges down on the underside and stitched them down,
as shown below.
Next, I stitched on the shoulder pieces (D) and pieces G and
H on the front. I tried on the jacket
and made a few adjustments to tailor the jacket more for my figure. Then I stitched on the arms. So far, the jacket looked like this:

The next part was the front center of the jacket- this is
the hardest part. I knew my machine
wouldn’t be able to stitch through four layers of suede, so I had to be strategic
about when and how I stitched each layer in place. The center pieces of suede (I) were designed
to be folded in half and stitched onto both the front and back of the jacket.
I started with the right side. First, I stitched piece I onto the back of
the jacket, leaving a little over an inch of excess material at the edge. It can be trimmed down later after the lining
is stitched on. I determined where the
fold was going to be and then aligned pieces C with the fold. The buttons will later be stitched to the other
end of pieces C.

Then, I folded the material for piece I in half and stitched
down the suede within a few millimeters to create a distinct edge.

I stitched down the other end of piece I to the front of the
jacket, as shown below. The excess inch or so of space I'd left at the edge allows the piece underneath to be folded out of the way while
stitching. Then I prepared the left hand
side to match the right hand side.

I also created an additional flap of material (B) for the
left hand interior of the jacket. Since the
jacket fastens with hooks, this piece is both aesthetic and functional, as it
prevents gaps and keeps cold air from getting inside the jacket. The flap, shown below, has an elongated edge
for stitching it underneath piece H before attaching piece I.

After pieces I were stitched in place, I attached pieces K
to align at the bottom.
The rest of the steps are mainly aesthetic. I trimmed pieces C to my desired length on
the ends and stitched them down before hand sewing the buttons at the end. (I had to use an awl to help make the holes due
to the thickness of the layers of suede.)
I also stitched the coat hooks along the inside of the jacket so it
could be fastened. I created a collar with
pieces E, but waited to stitch it to the jacket until I was ready to attach the
lining.

The jacket wasn’t quite as symmetrical as I’d hoped, so I
made a belt (pieces A stitched together, folded in half, and stitched down) and
belt loops (pieces F folded in half and stitched down) which nicely covered the
imperfections. I used a slide adjuster as
a fastener for the belt.
I stitched together all the pieces of the lining, which made
a thin shell the size and shape of my jacket.
I then stitched the lining to the inside of the jacket, starting along
the flaps I had left at the front center.
At the top, I attached the lining inside the collar while I stitched on
the collar. The arms were a little
longer than needed, so I folded the suede under, stitched in the lining, and
added multiple rows of stitching to strengthen the job. At the bottom of the jacket, I cut a few strips
of suede to stitch to the inside of the jacket with the lining attached in
between.

This is the finished garment! It's my first attempt at a jacket and it fits pretty well. The
material is amazingly soft yet sturdy and has that new leather smell.


