Monday, January 20, 2020

White Layered Bow Tie


Here’s the next installment for Bow Tie Friday! 


Materials needed include two types of ribbon, scissors, needle and thread, sew on Velcro, and a pendant (not pictured below; see on finished product.)  


I found a decorative 3/8” ribbon that I really liked but it was too narrow for the bow tie, so I searched for a larger size to pair it with.  As shown below, I layered the 3/8” ribbon and a 5/8” inch ribbon selection and stitched them together.


I cut a strip, looped it as pictured, and stitched it in place to create the left side of the bow.  Then I made a matching piece for the right side. 


Next, I cut a long strip to go down the center of the tie with about ¾” excess length and stitched all three pieces together at the top center.  For the neck band, I cut out a 16” piece of the 5/8” ribbon by itself.  (It will fit under the shirt collar and not be seen.)  I flipped the excess length over to the back and stitched it over the neck band onto the back of the tie. The back of the tie is shown below.


I sewed Velcro on the ends of the neck band so it can be easily put on and taken off.  Lastly, I stitched on the pendant.  It brings the piece together and also helps cover some of the stitching.


Note: I later added a little Fray Check to the cut ends of the ribbon to prevent them from fraying.


Sunday, January 5, 2020

Black and Silver Bow Tie


When it’s Bow Tie Friday but there’s not much of a market for women’s neckwear, sometimes it's easier to make your own accessories.  This particular bow tie combines a more formal look with a touch of a western feel.  It is most definitely the easiest project I have made in the past year! 


Materials needed include ribbon, scissors, needle and thread, sew on Velcro, and a little bling (in this case, a jeweled pendant).  I also used a sewing machine for speed but you could easily do without.


The first step is to loop the ribbon, starting with the two shortest loops at what will be the top of the bow tie.


I added two middle loops and then one long loop at the bottom (which will be cut in half as shown.)


After the loops were finished, I stitched them together at the top.  I started with thread and needle to hold them in place and then added more stitching with my sewing machine for reinforcement.  You could easily do this all by hand.

Next, I put on a collared shirt and measured around the neck.  I used the measurement (with a little additional length for overlap) to cut out a piece of ribbon and stitched it onto the back of the tie.  As shown below, I stitched Velcro on the ends for ease of attachment.  (One piece needs to go on the top side and the other on the bottom side of the ribbon.)  I know there are fancier fastening options, but let’s be realistic- I need to be able to actually get this off after a day at work!


The last step was to stitch the sparkly pendant on the front with needle and thread.  It covers the stitching and adds a little flair.  That’s it!  You could experiment with different ribbon sizes and colors.  This turned out pretty formal, so I paired it with a white shirt and black vest.


Sunday, October 13, 2019

Burgundy Suede Jacket


Last winter, I started creating a suede jacket using a soft garment grade sheepskin I’d gotten from Tandy Leather Factory.  It was a lot more difficult than I anticipated, but I’ve finally completed it in time for fall!


Materials needed:

Scissors, lining material, garment grade sheepskin (multiple skins), coat hooks (6), buttons (8), needles, and awl


Thread (3-4 spools), sewing machine with leather needles, clips, tape measure, marker, ruler, newspaper (optional, not pictured), slide adjuster, pins


I created my own rough pattern with newspaper and used a well fitting jacket I already owned to help me estimate the size of the pieces I designed. I traced the pieces onto the back of the sheepskin and cut them out.  I then traced the non-decorative pieces of the jacket onto a lightweight material that I would later assemble for the jacket’s lining.


Here are the main shapes and pieces I created:

Back of jacket:


Front of Jacket:


Miscellaneous:

A- Three belt pieces
B-   Inside flap
C-  Decorative strips for front
D-  Shoulder pieces
E-   Collar
F-   Belt loops


Arms:


I began stitching together the pieces of suede, starting with the back center of the jacket.  At each seam, I also folded the edges down on the underside and stitched them down, as shown below.


Next, I stitched on the shoulder pieces (D) and pieces G and H on the front.  I tried on the jacket and made a few adjustments to tailor the jacket more for my figure.  Then I stitched on the arms.  So far, the jacket looked like this:


The next part was the front center of the jacket- this is the hardest part.  I knew my machine wouldn’t be able to stitch through four layers of suede, so I had to be strategic about when and how I stitched each layer in place.  The center pieces of suede (I) were designed to be folded in half and stitched onto both the front and back of the jacket.

I started with the right side.  First, I stitched piece I onto the back of the jacket, leaving a little over an inch of excess material at the edge.  It can be trimmed down later after the lining is stitched on.  I determined where the fold was going to be and then aligned pieces C with the fold.  The buttons will later be stitched to the other end of pieces C.


Then, I folded the material for piece I in half and stitched down the suede within a few millimeters to create a distinct edge. 


I stitched down the other end of piece I to the front of the jacket, as shown below.  The excess inch or so of space I'd left at the edge allows the piece underneath to be folded out of the way while stitching.  Then I prepared the left hand side to match the right hand side.


I also created an additional flap of material (B) for the left hand interior of the jacket.  Since the jacket fastens with hooks, this piece is both aesthetic and functional, as it prevents gaps and keeps cold air from getting inside the jacket.  The flap, shown below, has an elongated edge for stitching it underneath piece H before attaching piece I.


After pieces I were stitched in place, I attached pieces K to align at the bottom.

The rest of the steps are mainly aesthetic.  I trimmed pieces C to my desired length on the ends and stitched them down before hand sewing the buttons at the end.  (I had to use an awl to help make the holes due to the thickness of the layers of suede.)  I also stitched the coat hooks along the inside of the jacket so it could be fastened.  I created a collar with pieces E, but waited to stitch it to the jacket until I was ready to attach the lining.


The jacket wasn’t quite as symmetrical as I’d hoped, so I made a belt (pieces A stitched together, folded in half, and stitched down) and belt loops (pieces F folded in half and stitched down) which nicely covered the imperfections.  I used a slide adjuster as a fastener for the belt.

I stitched together all the pieces of the lining, which made a thin shell the size and shape of my jacket.  I then stitched the lining to the inside of the jacket, starting along the flaps I had left at the front center.  At the top, I attached the lining inside the collar while I stitched on the collar.  The arms were a little longer than needed, so I folded the suede under, stitched in the lining, and added multiple rows of stitching to strengthen the job.  At the bottom of the jacket, I cut a few strips of suede to stitch to the inside of the jacket with the lining attached in between.


This is the finished garment!  It's my first attempt at a jacket and it fits pretty well.  The material is amazingly soft yet sturdy and has that new leather smell.


Saturday, January 19, 2019

Viking Six Panel Hat


To stave off the cold, I’ve created a Viking six panel hat created out of a deep burgundy garment sheepskin with rabbit fur trim.  It’s lined with matching burgundy linen for extra warmth.  The basic six panel hat and lining are pretty easy to make; the fur trim took up the most time and effort.


Materials used include: Garment sheepskin, linen, rabbit fur, and thread to match the sheepskin.  While I went with natural materials, you could easily substitute other fabrics or faux fur if you wanted.


Additional materials include: Sewing machine with leather needle, scissors, measuring tape, sharp knife, marker, needles, thread to match the fur, small clips, white charcoal pencil, ruler, pencil, pen, ruler, and straight pins.


First, I created a pattern for the six panels that will be connected to make the hat.  For scale, every four squares is equal to one inch.  The hat ended up with a circumference of 22 inches, so you may want to adjust the pattern or the seam allowance depending on your desired circumference.


I traced the pattern onto the linen six times with the charcoal pencil and then cut out the panels.


I repeated the process with the sheepskin, marking the ‘leather’ side with a marker since I want the suede side to show on the finished product.


Next, I stitched one edge of the lambskin panels together as shown, with the suede sides touching in the middle.  I used clips since pinning leather isn’t desirable. 


This shows the seam allowance I used.   Next I attached the other end to the next panel and repeated until all six panels were stitched together.


I followed the same steps for the linen, except I was able to use pins instead of clips.  If you are unsure about the sizing of the hat, you may want to do the linen section before the sheepskin one.  Linen is much more forgiving to fix (and cheaper to scrap if you need to start over.)


After the six panels were stitched together, I folded the seams over and stitched them down.  This will help strengthen the hat and allow it to lay nicely.


I wasn’t able to stitch all the way to the center of the hat using the sewing machine, so I flipped the hat to the suede side and finished stitching by hand.


I measured and cut a strip of linen approximately 3.75 inches by 24 inches (circumference of the hat plus an extra inch on each end) to use for the backing of the fur trim.  You could also sew the fur directly onto the hat instead, but the rabbit skin is delicate and I wanted a little additional strength and reinforcement.


I cut two matching strips of rabbit fur.  They were just barely long enough for my hat so you will want to measure and select your fur accordingly.  It’s also important to make sure that the color and direction of the fur on the pieces that you use matches.  Alternatively, you could use another type of animal with a larger pelt to avoid using multiple pieces.  I used a sharp knife to cut the rabbit skin- you don’t want to use scissors because you will cut the fur, too.  You just want to very carefully cut the layer of skin apart.


To attach the two strips of fur, I placed them so the fur sides were touching and stitched the ends together.  Then I stitched the fur to the linen strip by hand (back of strip shown to demonstrate position of stitching.)  I used thread that was similar in color to the rabbit fur for any stitching that would actually go through the rabbit skin.


At this point, there were three pieces to the hat- the outer suede part of the hat, the linen lining, and the fur trim attached to a strip of linen.


The lining should be turned so that it fits inside the suede hat so that the seams aren’t showing.  The linen strip has one edge that overlaps with the fur and one end that is just linen.  I fit the end that is just linen between the suede hat and the linen lining (fur side down) and stitched it as shown. 


This way, the machine stitching attaches all three pieces but doesn’t actually go through the rabbit fur itself.


Lastly, I turned up the fur trim to the desired length and hand stitched the fur to the suede hat.  (Just a few small stitches per panel held it in place.)  The back of the hat where the two ends of the rabbit fur met required more stitching.


This is the finished hat.


Saturday, June 23, 2018

Amazon Belt


The natural materials and unfinished edges in this Amazon belt were designed to give the piece an earthy, primal feel with an interesting variety of textures.


Materials needed: Leather remnant scraps (natural colors) and rabbit fur.  For this particular look, I used soft, thick, and crinkled pieces of leather.


Materials, continued: Leather cement (EcoWeld), q-tips, clasp rivet (antique brass), scissors, rivet tool, 17 cap rivets (antique brass), leather hole punch, thread, needles, sew on Velcro, hammer or mallet, and clips.  Not pictured and optional: sewing machine with leather needles; dress form; artificial sinew, beads, and coin for decoration.


I assembled leather remnants and chose my color scheme (black, dark brown, and tan.)  I selected long pieces that had an unfinished look and loosely wrapped the pieces around my waist to see which ones would best fit together aesthetically (shown on dress form.)  There are three basic layers of leather: the bottom pieces (tan), a middle layer (dark brown pieces) and the top of the belt (black pieces.)  Due to the way the layers overlap, the bottom layer will need to be made of your largest pieces of leather and the top layer will need to be the most narrow pieces.


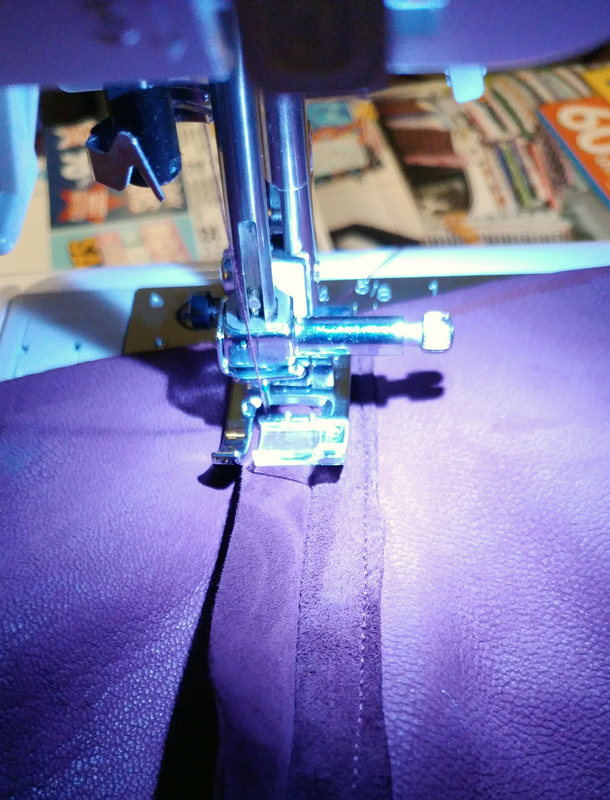
Next, I clipped a piece of each of the bottom two layers together and used my sewing machine with a leather needle to stitch them in place.  My particular machine worked fine with this soft type of leather, but you will have to determine whether your machine is suitable or whether you should hand stitch.

The first two pieces after stitching are shown below.


Next, I positioned the thinner strip of black leather at the top.  I used the leather punch to punch holes through the layers and then loosely attached the pieces with the cap rivets (I didn't hammer them down at this point.)  See instructions further down for rivet placement.


I continued to build the belt horizontally by attaching additional pieces of leather, starting with the bottom tan layer and building up.  I used the scissors along the way to trim as needed.  As you can see on the bottom layer pictured below, I positioned all of my stitching to be covered by other layers so it will not show on the final piece.


Once the bottom pieces were attached, I stitched the middle dark brown layer over top, again, being mindful of my stitching placement.


Next, I attached another black piece to the top.  To help with equal positioning of the rivets, I cut a small piece of paper the length I wanted between each rivet (from center to center) to use while punching the holes.


I continued attaching the remaining pieces of leather in the same fashion until all my selected pieces were secured together. I wrapped the belt around my waist again and marked the leather where I wanted to attach the ends together with Velcro.  I stitched the coarse side of the Velcro to the top side of the belt in the desired location using the sewing machine.


On the opposite end, I removed a few of the cap rivets and stitched the soft side of the Velcro to the underside of the belt, as shown in the two photos below.  Then I reattached the black piece of leather using the cap rivets.  [Note: I ended up needing to tighten the belt further, so you may notice later that I added another piece of Velcro to the final piece to compensate for that.]


I used scissors to shape and roughen up edges of the leather that looked too neatly cut to give it a more rustic, primitive look.


I wrapped the belt back around my waist and positioned a couple of scraps of rabbit fur to hang down beneath the leather.  I roughly stitched the fur to the bottom layer of leather (tan) by hand using needle and thread, being careful to position all of the stitches so they would be hidden underneath the dark brown or black layers.


Once all the stitching was completed, I applied leather cement between each set of rivets to further secure the layers.  Then I used the rivet tool to hammer the rivets in place.


For additional decoration, I strung some natural looking beads and a coin using artificial sinew, wrapped the sinew around one of the rivets, and then hammered the rivet down.  The beads I used were made of wood, metal, and bone.


Although the Velcro does most of the work in securing the belt, I needed to secure the very end to prevent it from sticking out.  I punched a hole on the bottom part and screwed in a clasp rivet (far left.)  Then I punched a larger hole on the top piece and snipped a keyhole shape using the scissors.


This helps to hold the end of the leather down, as shown below.


That’s it!