These Wonder Woman boots were time consuming, but worth it! These are truly boots and not separate heels
and greaves. Like my previous posts, this tutorial is intended to give you inspiration on how to create a custom made piece to fit
you. Part I included the supplies needed
plus basic construction while Part II covers the painting and the rest of the
assembly. If you haven't already read Part I, I suggest reading it first.

The boots are comprised of three main sections: kneepad,
middle section, and bottom of the greaves.
Now that each section has already been stitched and cemented in Part I, the next
step is painting.

I painted the kneepads in all golds and silvers. The middle stripe is gold in the center and silver on the edges, with some different shades and blending used to make it more three dimensional. I also highlighted the stitching with a dark gold color. The main section of the kneepads are dark gold.

I painted the kneepads in all golds and silvers. The middle stripe is gold in the center and silver on the edges, with some different shades and blending used to make it more three dimensional. I also highlighted the stitching with a dark gold color. The main section of the kneepads are dark gold.

I painted the middle of the greaves (both front and back pieces) with matching gold and
silver stripes and a red color comprised of a combination of alizarin crimson, gold, and
black paint. To add more dimension, I
painted black stripes over the three stitched lines and blended lighter shades
of the red paint for depth.

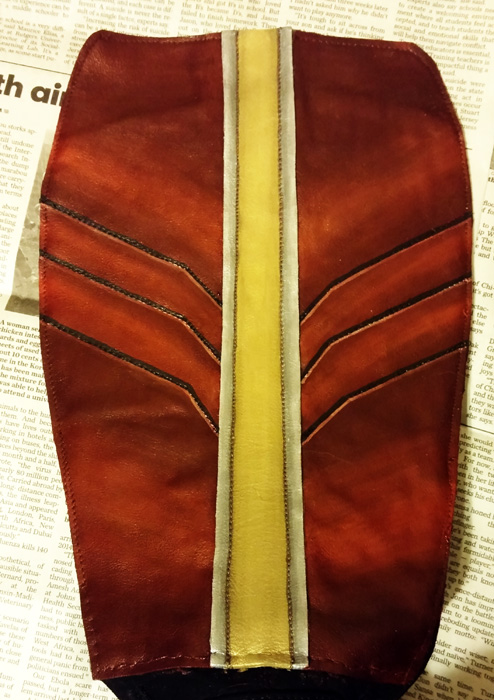
The bottom pieces of the greaves are similar with matching stripes and matching red paint. Again, I used several shades of the red paint to create depth.

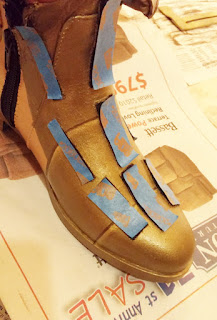
The bottom section also includes the foot of the boots
themselves. I used primarily gold and
flesh tones to roughly simulate the wedge sandal appearance, as shown below.

After the paint was dry, I coated each piece separately with
an acrylic finisher and a water repellant for added protection. For the foot of the boots, I covered the
Velcro and zipper with masking tape and applied the acrylic finisher and
repellant to the painted areas only. I also covered the bottom of the boots
while painting and spraying so they didn't become slippery. Due to the heavy and detailed paint job, I
will not be wearing these boots in the rain, even with the protective layers.

Once the painting and finishing was complete, I compiled
straps, cap rivets, and clasp rivets for the final assembly process. I used two sizes of cap rivets, as shown
below. I used 6 larger and 5 smaller
rivets per boot, for a total of 12 large ones and 10 small ones.

I used 11 clasp rivets per boot (22 total), size shown below.

For the boot straps, I cut strips of brown leather. I made the top strap for the kneepads slightly thicker than the others, with a width of 5/8". All the other strips are 1/2" wide. I also used tiny strips to reinforce the ends of the leather that fasten over the clasp rivets by cementing a small strip onto the back of each piece, as shown.

Kneepad assembly:
After arranging the three kneepad pieces into a position
that fit comfortably over my knee, I punched holes for the cap rivets with the leather punch.


I used six large cap rivets to fasten the three pieces to
each other and to the top of the boot, as shown in the final product below.


On the top section
(inner side) of the kneepad, I used the leather punch and scissors to cut a
slit for attaching the 5/8" strap.
I threaded the strap through the slit and cemented as shown in the photo
below.


Once dry, I punched a hole through the leather and attached
a small cap rivet (not attached in this photo.) This gives the strap
additional structural reinforcement.


On the other side (outer side) of the kneepad, I punched a
hole and attached a clasp rivet fastener.


I created a keyhole slit on the end of the strap, as shown below, to fit over the fastener by first using the leather punch and then making a small snip with the scissors. All of the straps in this project will be cut this way for fastening.

Middle Greaves Assembly:
Top strap: I attached
a clasp rivet to the front of the greaves on both sides. The strap simply wraps around the back of the
greaves, as shown.


Middle and bottom straps: I used the hole punch and scissors to create a slit in the front of the greaves. Then I attached the leather straps directly to the boot (as shown below), cutting the leather to size and using a small cap rivet (which will be hidden when the strap is fastened) to secure the pieces.


Bottom of the greaves assembly:
The bottom of the greaves attach with Velcro and the straps
are really just for show. First, I
punched two holes in the two larger pieces of the greaves (one on each
side.) The smallest piece will not have
any holes. Then I fitted a clasp rivet
in each hole (four total per boot.)

Only the top two pieces have straps, which I attached and cut to size. I used needle, awl, and thread to stitch the other side to the boots. As shown, I also stitched a small leather strap at the top of the enclosed foot area.

Only the top two pieces have straps, which I attached and cut to size. I used needle, awl, and thread to stitch the other side to the boots. As shown, I also stitched a small leather strap at the top of the enclosed foot area.

This concludes the basic assembly! I found that the particular style of boots I selected were a little too floppy where the calves and feet meet and I cut a piece of sturdy leather to fasten inside for support. Depending on the type of boots you used for the base, you may have to make similar minor accommodations.

The one piece design and sturdy base make these boots easy to wear and practical for walking! I do recommend that you store them carefully using some sort of packing materials to help them retain their shape and protect the paint.
I like how you made these with all leather and the stitching looks nice. I used the same fasteners on my own (Craft foam outside with Worbla backing it for shape/ strength..<opposite of what most people have done).
ReplyDeletehttps://www.facebook.com/photo.php?fbid=10212970809212546&set=a.10212358197337632.1073741872.1460881361&type=3&theater
ReplyDeleteLooks good!
Delete