My Wonder Woman corset combines the flexibility and strength
of leather and the comfort of fabric with some additional support built
in. Similar to my WW gladiator skirt,
the corset features two layers- a soft interior and a leather exterior. When originally sketching my idea, I imagined
how convenient it would be with a built in bra and then decided to make that a part of the final design.

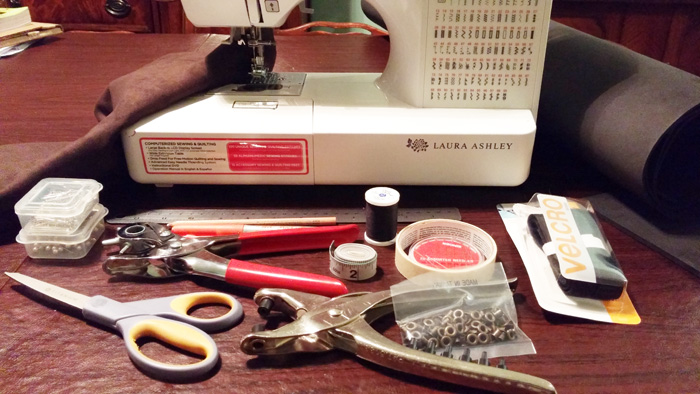
Materials needed: Fabric, sewing machine, needle, thread, pins,
white charcoal pencil, scissors, Velcro, ruler, leather punch, measuring tape,
eyelets, eyelet tool, marker, masking tape, 6 mm EVA foam (2 rectangles 9"x12),
2mm EVA foam (used small portion of roll).
Not pictured: bra (will be used in costume), non-stretchy shirt (just
for measuring, will not be used in actual costume), lacing for back of corset.
Materials, continued: Leather, acrylic paint (I used the
same thalo gold, black, and alizarin crimson paint from previous costume pieces
plus the Angelus autumn red to thicken up the base layer), paintbrushes, matte
acrylic finisher, water and stain repellant, Ecoweld (leather cement), q-tips, foam ball (whole or half sphere in your
desired cup size), heat gun, foil.

If you are making a full costume, you will want to make the
corset top after the skirt so you can adjust the length to line up well with
the skirt. I am using photos with a
dress form to help illustrate- a dress form is not required and I did not
use the dress form for measuring. You
want the measurements to match your body, not the dress form's.
Part I encompasses the fabric under layer of the corset. I started by wearing the Wonder Woman skirt and a fitted
shirt that wasn't too stretchy. I used
masking tape to mark the shirt approximately where I wanted the corset top to begin
on top and end at the bottom.

I traced the shirt onto a sturdy, non-stretchy fabric (same
material I used for the skirt) in four pieces with the white charcoal pencil
and cut them out, as shown below. (The
outside edges will go in the back, where the top will fasten corset-style.) As with any corset, be careful not to use too
much material. (You can always let the
strings out a little if it is too small but there is a point at which you
cannot fasten a corset any tighter if it is too big.)
I did leave enough length in the back so I could fold the edges under
and stitch later.

I pinned the material as shown below.

Then I sewed the four pieces together. For the
middle seam, I did not stitch all the way to the top (see next photo-
the top center needs to be open.) Note
that I also did not stitch the top edge or back edges at this point.
The costume has a bra stitched in for support, fit, and
comfort- you will either cut off or hide the straps at the end, so an older bra
with fraying straps would be ideal.
While wearing the bra, I pinned on the material and tucked excess fabric
under the bra band to create a fitted piece. Below, you can see the pinning.

Then, I stitched the fabric to the bra by hand.

I stitched the material to the band, as shown below, with
excess fabric tucked under. I did not stitch the band all the way to the back- I want the band to be able to stretch in the back
without being attached to the fabric.
Also, note how the back edge is folded under and pinned. This will be stitched after support is added
and excess material underneath can be trimmed.

I sketched and cut out two leather strips that matched the
length of the corset back. Then I
stitched the leather in between the two layers of fabric where I had folded it
over.

Next, I punched holes through the fabric and leather and installed
eyelets using an eyelet tool. The
leather inside serves to provide support and to prevent the eyelets from being
ripped out. I cut out a section out to
accommodate the tuck in the fabric.

Then I stitched it to align with the tuck.

The under corset is complete. You can see how it fastens in the back
(again, the dress form is just for show- it was not the same as my measurements.) The piece fits me more uniformly than it does the dress form.

See Part II for directions on how to construct the leather outer layer.
No comments:
Post a Comment